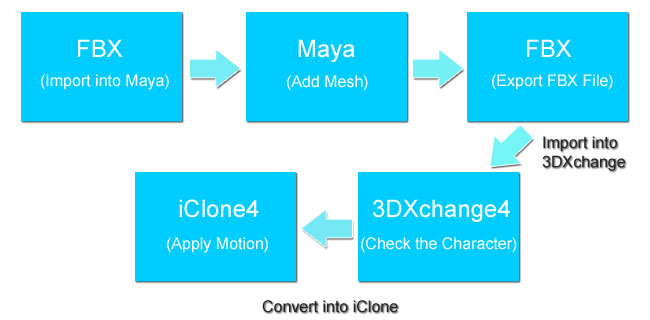
Welcome to iClone tutorial for importing Maya template into iClone. In this lesson you will need 3DXchange, iClone and the newest FBX Plugin available for Maya.
The following image illustrates the pipeline of how to import Maya Characters into iClone.

If you have purchased 3DXchange Pro from Reallusion, the iClone Standard Character is included in the resource pack.
In this tutorial we will guide you through the process of how to modify the existing G3 Character model and import it to iClone. After you are done with this tutorial, you will be familiar with the following concepts:
Concept 01: There are 5 interchangeable body parts allowed in iClone.
Characters are handled in a specific way in iClone. So before we build any characters for iClone, there are some concepts we need to discuss in order for the process to progress smoothly.
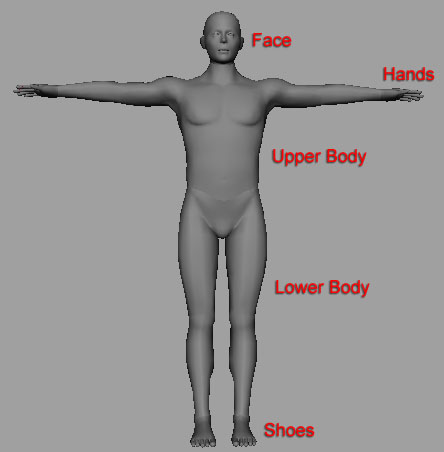
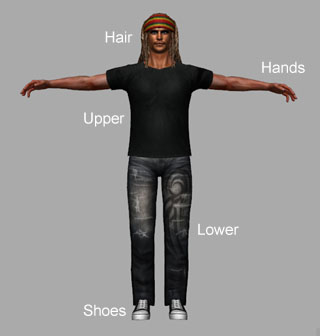
On the iClone G3 character, you will find 6 interchangeable body parts. Of those parts, only 5 can be created from scratch or edited from an existing model. The basic body parts are:
Face: The face is the only part you don�t explicitly model. This object is handled differently as will be discussed in the "About the Head Section".
Hands: The hand parts are separate from the upper limbs to allow for interchangeability.
Upper body: The upper body contains the torso and arms.
Lower body: The Lower body contains the waist, upper and lower legs.
Shoes: The shoes are separate from the lower body to allow for interchangeability.
Concept 02: The vertex and edge border rules:
Rule #1: There must be a specific number of vertices and edges that make up the border between any two body parts. For example, where the neck attaches to the �Upper� body, there must be a specific number of vertices on the bottom border of the neck, and top of the torso where the neck attaches.
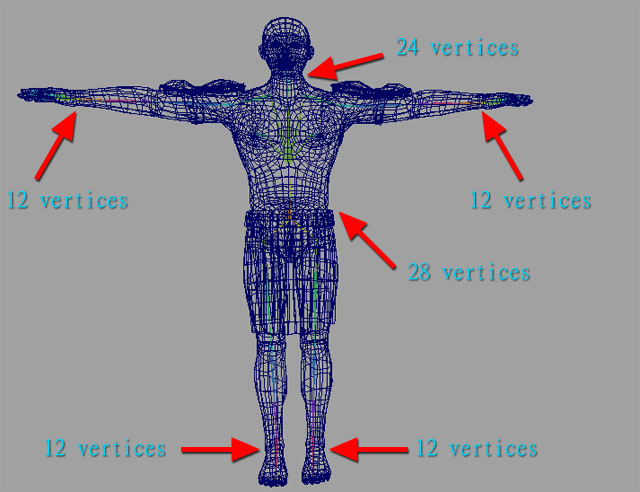
Rule #2: The vertices from each section must be able to connect to each other. This is fairly simple; Just make sure that the vertices from both pieces of geometry align together. It�s OK to move the vertices to accomplish this. Just make sure there are equal numbers of vertices on each section.
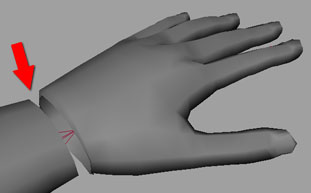
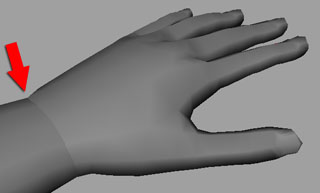
To avoid any gap between the connection border line, you may use the snap vertices tool to align the vertices closely together. For example: connect05_Upper and connect05_Hands.
|
|
|
Alignment with Gap |
Correctly Aligned |
Rule #3: The vertices must have appropriately named selection sets. Each border of vertices is given a specific selection set name at the sub object level. For each border line, it should have two sets. Eg. the border line for connect01 should have two selection sets, one is selected with the face mesh and the other one is with the upper body. There should be a total of 12 selection sets.
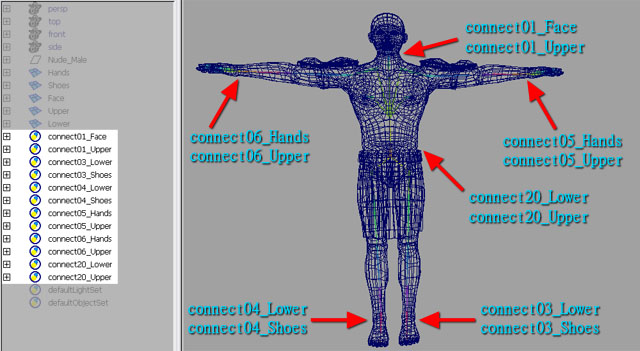
If you have not yet see the selection set in the outliner, here are the steps to add Select Set in Maya. The border vertices must adhere to the vertex and edge count requirements mentioned previously. For each body parts we will set an individual body connection set.
Highlight the face and select the neck line vertices.
Go to Create > Sets > Quick Select Set and enter the name: connect01_Face.
Notice an additional connect01_Face is added in Outliner.
Do the same for connect01_Upper, but this time select the neck vertices with the upper body selected.
Select the vertices along the bottom border of the Upper Body in the waist area. Name it connect20_Upper.
Then select the vertices of the lower body across the top (waist area). Name it connect20_Lower.
Another connection set should also add to the ankle section.
Select the LEFT ANKLE vertices of the upper body and the shoe and name the select set for these vertices connect03_Lower and connect03_Shoes.
For the RIGHT ANKLE vertices of the upper body and the shoe and name the select set for these vertices connect04_Lower and connect04_Shoes.
Now, select the HANDS. Select the border vertices of the LEFT WRIST of the upper body and hands, and name it connect05_Upper and connect05_Hands.
For the RIGHT WRIST, select the border vertices of the "upper" body and name the select set connect06_Upper and connect06_Hands.
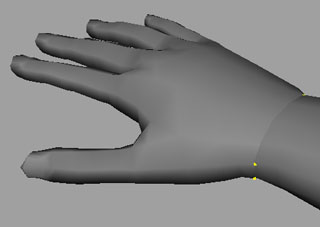
Before you proceed to the next step, please make sure all the border lines match to the number of vertices for each body part.
Concept 03: The bone structure is different in iClone.
Maya has its own bone system, so please do not change the naming and structure of the RL bones.
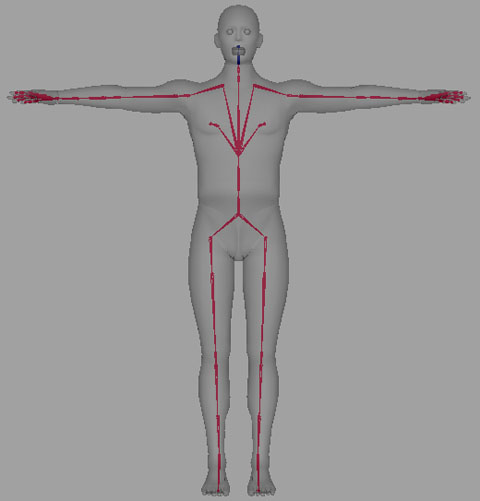
When you are importing iClone Standard Characters into Maya using the FBX file, you do not need to adjust any of the settings in the FBX Importer. You may leave the settings as the default.
By scaling the RL Bone of the iClone Standard Character, you will be able to change the overall proportion and the body shape of the character.
Launch Maya. Import the file right into Maya by dragging and dropping the fbx file.
Let's first transform the G3 character into a muscular superhero by scaling its RL bones.
Select a RL Bone from Outliner to scale.
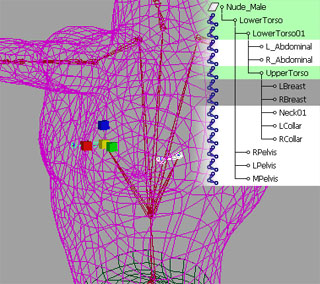
Note: You may scale multiple body parts by holding shift and selecting additional RL bones. It's useful when adjusting left and right limbs simultaneously at the same time to maintain symmetry.
Select the body parts you want to adjust by clicking on the RL bone. Scale the bones to deform the mesh and exaggerate the muscle bulge.
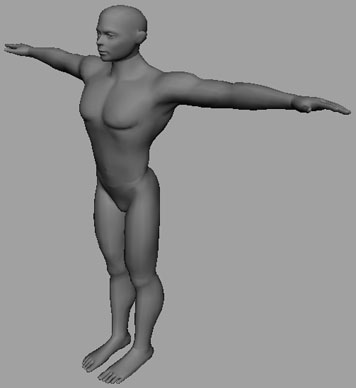
Here is my character after adjusting the character's body.
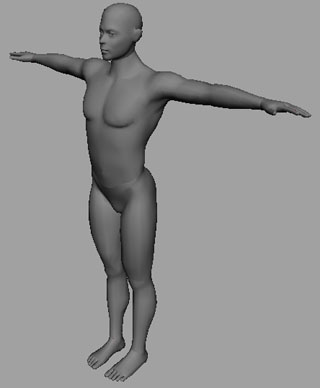
Before
After
Saving skin weights saves us a lot of time when adjusting every single part of the body. By doing this, we can easily load the weighting from the iClone Standard character after we have modified all the meshes.
Before you save the skin weight of the character, you need to think about which body part mesh will be modified. For my character, I will be modifying the upper body and lower body with a new mesh. Thus, the upper and lower body are the ONLY two parts I will save the skin weight maps for.
Highlight the upper body mesh and choose Export Skin Weight Maps to save skin weights.
Select a place to store the skin maps and confirm the number of skin maps to be written.
Click Yes to confirm the writing.
Now, I will repeat the same procedure for lower body.
For us to add a new mesh to the character, you must first detach the information on the skin from the skeleton, then bind the skin again after you finish modifying the meshes of the character.
Please remember you only need to detach the parts of the modified skin mesh. E.g. if I have modified the skin mesh of the upper body, then I only need to export the weight maps of the upper body.
Select the upper body mesh from the outliner.
Go to Edit > Delete by Type > History. This removes all the relation between the mesh and bones, and give us a clean mesh to work on.
Now, all the bones have no weights.
This part of the tutorial is completely subjective. You can edit your object anyway you like.
To enhance your avatar�s characteristics, we can add and design additional meshes for the character. I have planned to make my character wear a badge on both arms.
Choose a cube polygon and adjust the number of subdivisions and the size of the polygon.
Model the polygon by using the extrude tool.
Then, use the merge tool to combine the vertices of the two faces.
The overall shape has been modeled. You may now refine the details of the model.
Once you have completed the right side, you may Duplicate Special to the other side. Inside the Duplicate Special window, select Instance and then Translate to mirror the other side.
When you move the vertices on the left side armor the right side armor also moves. You can use the steps described above to make any other mirror objects.
Add a Polygon Pipe and set to appropriate subdivision.
Since extrusion is really handy when modeling in Maya, I will use the extrude tool to model my dress.
Enable the Keep Faces Together for the back side of the dress, this will keep all the chosen faces together when you extrude.
Disable the Keep Faces Together for the front part, this will make the chosen faces separate slightly once they are extruded.
Texturing in iClone is handled on a per object basis, meaning you create the specific maps you need just for that object. Layered Textures are supported so you can have 2 materials per object. This is how you texture skin and clothes at the same time.
Before you begin texturing, you will need mapping coordinates for your geometry. UV Texture Mapping is not covered in this tutorial because this is considered a core skill to know for this tutorial.
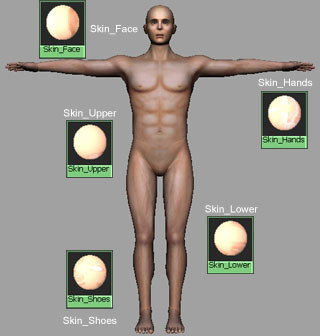
When you modify a character for iClone, you should follow the naming rule for both the skin and cloth. As you can see in the illustration below, all the skin textures include "Skin" in front of every body part. For the cloth part, "Skin" has been eliminated and only keeps the body part names for iClone to identify.
 |
 |
|
Skin Naming |
Cloth Naming |
Here are the steps for the lower body in more detail:
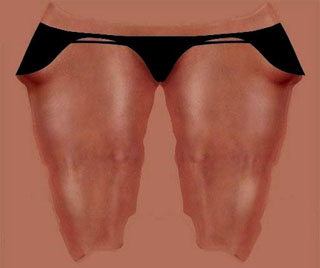
A. Create a skin material named "Skin", set the diffuse color white (255, 255, 255). Using your favorite image-editing program, create a texture map that approximates what the skin of your character would look like without clothes. It isn�t necessary to create all the details, just the details that will be seen. Remember, a 10x10 pixel swatch from the skin map is used for the skin tone matching system. Be sure that this is present in the skin texture map (as well as the others).
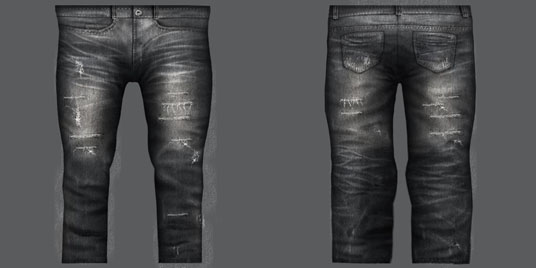
B. Create the Clothes Material named "Lower", set the diffuse color to white (255, 255, 255). Again, using your favorite image-editing program, create a texture map that represents the clothes your character will be wearing.
Here are examples of the Cloth map and the Skin Map used for the "Lower" body.
 |
 |
|
Texture Map for Lower Body |
Texture Map for the Lower Body Skin |
Select the polygons to apply new material to.
Go to Lighting/Shading > Add New Material and pick phong to apply the badge.
In the Common Material Attributes change the color to silver.
In the Specular Shading section adjust the specularity for the badge to a higher level.
Repeat the steps for the other additional meshes.
Before combining additional meshes into one piece, please remember that all the body parts are separate meshes, which divide the character into five parts: Face, Hands, Upper, Lower and shoes. Thus, if you have additional meshes for the upper body, you only need to select the new meshes of the upper body to combine.
With the upper torso and armors selected, click "Combine".
Now all the meshes have merged into a single piece.
Do the same for the lower body.
Applying the previously saved weight map is the stage where you need to use Maya�s bind skinning technique to allow the RL Bone system to skin with the character mesh again.
Select all the bones and body parts for importing weight maps.
Go to Skin > Edit Smooth Skin > Import Skin Weight Maps to apply.
See! My character can now move after applying the previous weighting map.
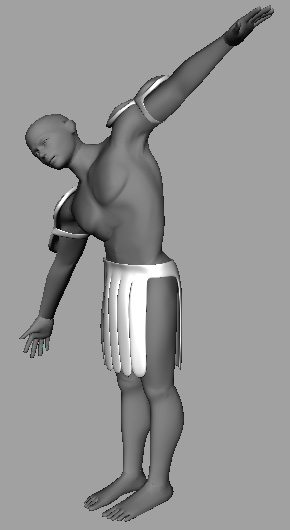
Plus, all the additional meshes move with it too.
Note:
Only "Face" can be skinned to the "Jaw" bone. Skinning body part models other than "Face" to the "Jaw" bone will cause a conversion error.
Since not all the points are weighted to the desired points as we wish, with the Component Editor, you can directly modify the values of individual skin point weights.
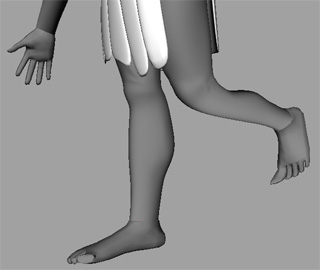
Select the skin points you want to weight.
Select Windows > General Editors > Component Editor. The Component Editor displays the component data for currently selected components in the workspace.
Click on the Smooth Skins tab. The Smooth Skins tab lists all the weights assigned to a skeleton's joint.
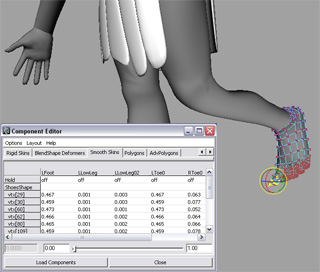
In the Component Editor you can enter the weighting values of the points to define which bone they should be weighted to.
Since we have added the desired accessories and adjusted the character, we can now export the FBX file.
Go to File > Export All.
Select FBX file type to be the export option.
The FBX Exporter pops up for advanced options.
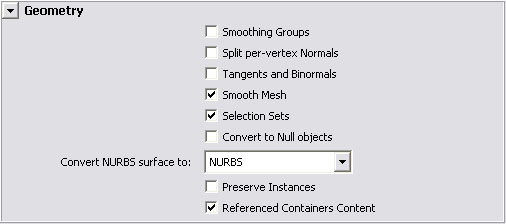
Ensure that Selection Sets is selected for the connection boundary to be identified when the character is imported into iClone.

Enable Embed Media for the texture maps to be embedded with the character.

When you export the FBX file, please make sure that you have Z Up Axis selected.
Import the FBX file to 3DXchange4. Check the character after importing into 3DXchange4.
If you are satisfied with the character, you can then convert it into an iClone4 avatar.
Import into iClone and apply motions to the character to see the result.