Export the Spring
Export the Prop
- Export model from 3ds Max
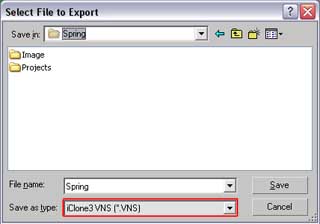
1. Go to File > Export.
2. Type a name for the model. This name will be used for the name as the .spx
file. Save as type
"iClone3 VNS".
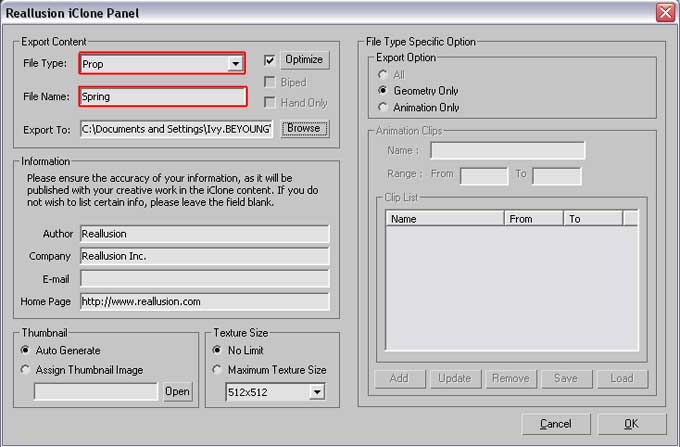
3. "Reallusion iClone Panel"
pops up for you to set the settings for the model.
Make sure that "File
Type" is set to "Prop".
- How do you prepare the Spring to work in iClone? In this section we will explain the spring setting spx file. The format of spx file looks like shown below:

| 1 | Gravity | The strength of being pulled downward. |
| 2 | Maximum Stretch | The maximum length change when the spring is pulled or compressed. When set 0, there is no effect of spring. |
| 3 | Spring Strength | It defines the softness of the prop. The higher the value is, the stiffer the prop turns to be. You can also adjust Spring Strength in iClone3 Modify Panel. |
| 4 | Damping |
Bounce back to the original
place faster with larger value. Bounce back to the original place
slower when set to smaller value. You can also adjust Damping in iClone3 Modify Panel. The Corresponding Parameter in iClone is "Bounciness" and the value is set to the opposite direction of the damping set in .spx file. |
| 5 | Mass |
It defines the object's weight which influences the prop's bouncing angle. The higher the
Mass values is, the larger the bouncing angle is. A higher value makes the props bounce heavier. You can also adjust Mass in iClone3 Modify Panel. |
Import the Prop and Spring Setting
Let's import the prop right into iClone.
1. Launch iClone3. Click on
![]() >
>
![]() to import prop into
iClone3.
to import prop into
iClone3.
2. Click import
![]() in the right side
panel of iClone window.
in the right side
panel of iClone window.
3. Please remember, before you import
the iProp file into iClone that both of the iProp file name and .spx
file name should be the same. Otherwise iClone may not be able to recognize the
spring settings.
This will cause the spring not to function properly in iClone3.
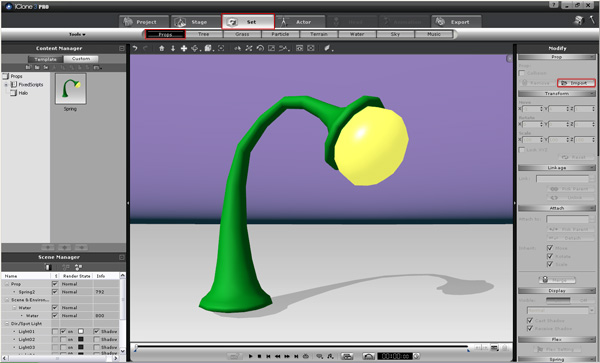
4. Go to "Set" > "Props"
> "Import". This will now import your fabulous Spring right into the
scene. Here
is the Spring in iClone3. Remember that we have set the initial pose
for the selected Spring. See! Here
is the first pose that the spring acts.
5. Click the "+"
button below the Content Manager to add the spring prop to your assets.
Once the prop is saved, the spring setting is embedded and saved with the prop,
and the external
spx file is on longer needed.
Test the Spring Prop and Save It as Spring Accessory
1. Add the spring prop we just created.
2. Attach it to the Avatar.
- Import an avatar into the Scene.
- Position
the Spring to the place where you prefer and click "Pick Parent"
in the "Attach"
section.
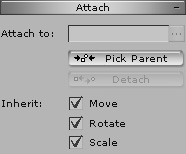
- Pick the
body part where you want to attach the Spring. Now the Spring is an
accessory
and moves with the avatar.

Fine-tune Parameters
There are two ways to fine-tune the Spring parameters:
1. Modify the
SPX file.
This doesn't work
on the existing spring prop in the scene.
You have to
reload the prop with accompanying spx file.
2. Adjust the strength parameters in
the Spring modify panel.
This works directly on the
existing spring prop in the scene.
However, the range of adjustment is
limited.
(Min - 50%, Max =
200%)

Go to the following video to see the movement of the Spring. Please enjoy!
| Note: |
|
Create a Spring
- Start with the Model
- Add Dummy
- Export the Spring