So you have a model of a car, or dune
buggy. And you want to go driving across the Sahara desert, yet
you seem to not
be driving over the slopes of the rolling dunes! Or even worse, your car makes
90 degree turns and you cant drive along those curved coastal roads of
California! What gives?! In this lesson, you will learn how to adjust the
parameters to accomplish exactly what you are looking for!
This tutorial provides you with the
information about setting the attributes to create a moving prop. Make the car
speed up and slow down, then switch between these two behaviors in iClone.
Behaviors are created by defining the attribute "ModeID".
You can create ModeID "1" for all the motions that is included for low speed
command. Then, you can create different behavior for ModeID "2" for all the
motions that is included for high speed. In iClone, you can then switch between
these two modes by using "X" and "Y" hot keys.
In this tutorial you can also learn to add Terrain Follow. This can set the prop
to follow the angle of the terrain to move more smoothly when moving.
Set ModeID for Different Behaviors
Low Speed: ModeID 1
-
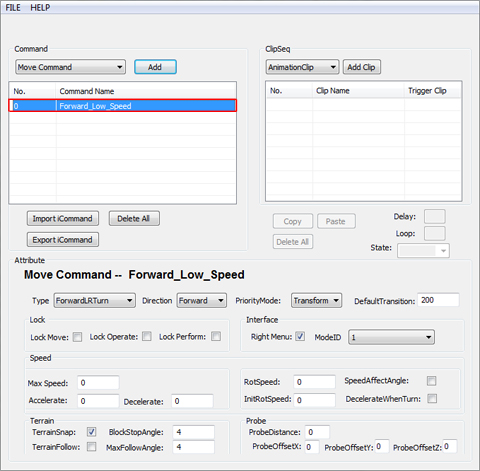
Select Move Command from the
command drop down list. Click "Add".
-
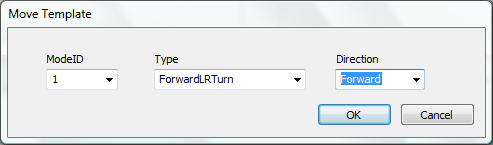
Move Template floater pops up. Set
ModeID as "1", Type as "ForwardLRTurn" and Direction
as "Forward". Mode id sets the behavior mode for
selected move type. When you have more than one mode use the hot key "X"
or "Z" to switch between modes in Director Mode. Type is a combination of movement hot
keys when you use WASD to move the object. Direction defines the move
direction of the object.
-
Rename it "Forward_Low_Speed".
-
In the Move attribute section, set
the attributes for your move object.
-
Check "Right Menu" to set to
have the command name show in the right-click menu.
-
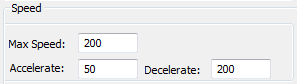
Of course you want to control the
speed of your object. Set the max speed and test it out, so the object won't
flip over. When the object has reached to the maximum, the speed of the object
remains steady. Set 200 (cm/sec) for MaxSpeed.
-
When the speed has not reached to the
maximum speed, then the object enters the accelerate mode defined by cm/sec.
-
Set decelerate attribute for the
object to slowly moving toward the destination point or when you want the object
to slow down.
-
RotSpeed
controls the rotation speed (degree/sec) of the object. The larger the
value, it turns faster when you press left/right turn keys; the smaller the
value, it turns more gentle and smoother, but it is possible that the prop
will not able to reach the destination because it turns too slow.
-
InitRotSpeed
(degree/sec) defines the speed which first must be exceeded before
rotation (turning) can begin. When InitRotspeed is defined as zero, then
when the prop rotates it will have the setting of the speed of RotSpeed
attribute.
-
Check
SpeedAffectAngle. When this attribute is set, the degree of the turning
angle determined by the speed of the object. If the speed is smaller than
the MaxSpeed, then the turning angle speed will relatively reduce.
-
Check DecelerateWhenTurn. The
traveling speed decelerates depending on the angle of the destination. This
simulates the status when a transportation is turning in decelerate state.

-
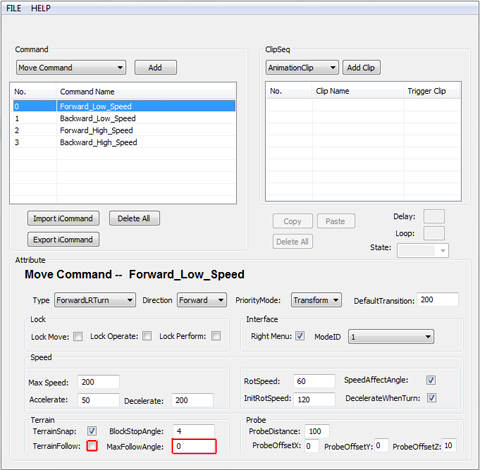
Check TerrainSnap. Now when the
object moves it snaps to the terrain in X, Y, Z axis.

-
Since MaxFollowAngle (degree/frame) setting only
corresponds with TerrainFollow and we have uncheck TerrainFollow. We will
set MaxFollowAngle to "0". When the MaxFollowAngle is used,
the smaller the value the smoother the result, but further from the original
terrain shape. When you have bigger value, the prop can follow the steeper
shape of the terrain.
-
Probe distance (cm) sets the block
distance between objects. When set probe
distance to blockages (the distance from the object's bounding box center
to the block). The object will stop or turn away from the block before
it hits the block.
-
When ProbeOffsetZ (cm) is set,
it reference the root of the character (0, 0, 0) then offset the Z (height)
and translate the block detection point. So when the character moves, it
automatically detects the height of the prop in front of the character. If
the ProbeOffsetZ is set too high and the prop is too low. Then, the
character will crossover the prop.
-
Add a new move command with ModeID:
"1", Type: "BackwardLRTurn" and Direction: "Backward".

High Speed: ModeID 2
Since
we have set two low speed move commands, lets follow the steps below to speed
up the object. Need more Speed!
-
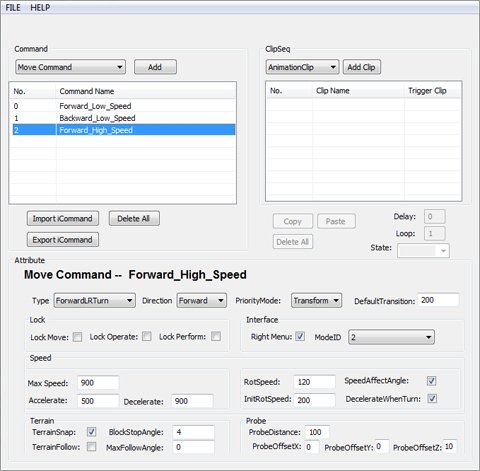
Add a move command with mode id "2".
This sets a different behavior movement for the object. When set this allows
the users to switch between low speed and high speed with hot key "X"
in Director Mode. Type: ForwardLRTurn and Direction: Forward.
-
Rename the command "Forward_High_Speed".
-
In the attribute section, it's
basically the same as Forward_Low_Speed. Don't forget that we are
making this command high speed. Adjust the Speed section.
-
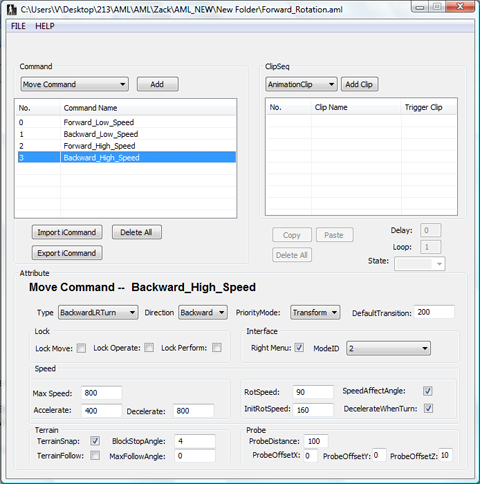
Add one more move command for
Backward_High_Speed. Don't forget to set ModeID: "2".
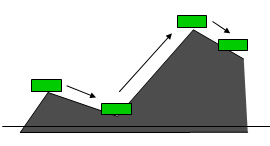
Terrain Follow
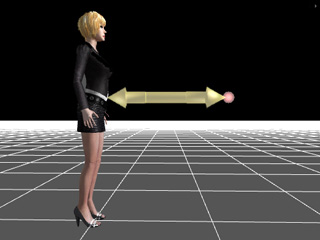
When you open Move_Rotation template
project you might have a question about what's the difference between these two
props. Well... The answer is here. The white iProp does not include the
TerrainFollow attribute but the blue iProp does. Why is that? Terrain follow
allows the object to move along the terrain and
follow the surface normally.
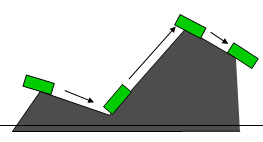
Check TerrainFollow
and set the maximum Z rotation angle (degree/frame). When an iProp is moving on
a low polygon terrain it moves more smoothly. When the value is small to a
certain number (compare to MaxSpeed) it creates a flying effect.

 |
 |
Terrain Follow: Not Checked
The
prop does not follow the Z rotation angle when moving. |
Terrain Follow: Checked
The prop follows the Z
rotation angle when moving. |
|