|
|

|
|||||||||||||||||||||||||||||||||
 |
| Create Custom BVH Profile | ||
Level: Expert You may in some cases encounter problems while converting BVH for iClone with BVH Motion Converter because of certain BVH format incompatibilities.The allowed bone structures in BVH are very flexible. Anyone can define a custom bone structure for their own purpose.There are only BVH profiles inside the iClone BVH motion converter, but due to the wide range of BVH format these conversion profiles may not satisfy all users' bvh files.This tutorial shows how to create custom BVH profiles for the iClone BVH motion converter, so you can make good use of the BVH assets you have with iClone.The profiles are .prf files located in \BVH Motion Converter folder. Let's take a look at the profile format: Motek //The profile name shown in the
converter. Step 1: Set bone mapping. BVH converter transfers the animations from BVH bones to HTR bones on an one on one basis.So the first step of creating a custom BVH profile is to establish the bone mapping table.If you are familiar with the data structures of BVH & HTR formats, you may create the mapping table with any text editor.An easier way is to use the backdoor interface of BVH converter. To activate it, follow the steps below:Locate "MotionConverter.exe" in the Windows Explorer. (the default path is C:\Program Files\Reallusion\BVH Motion Converter) On the Windows Start menu, select Run to bring up the Run dialogue. Add " /s" at the end of the line (Notice there is a space before the slash), it should looks like what shown below.
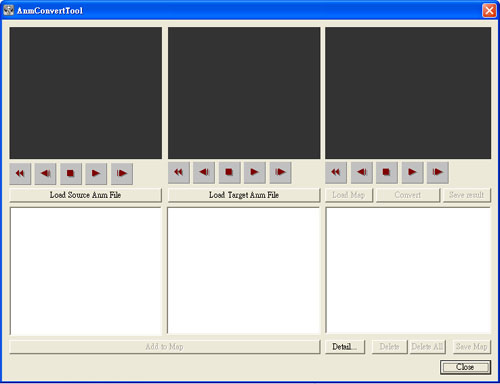
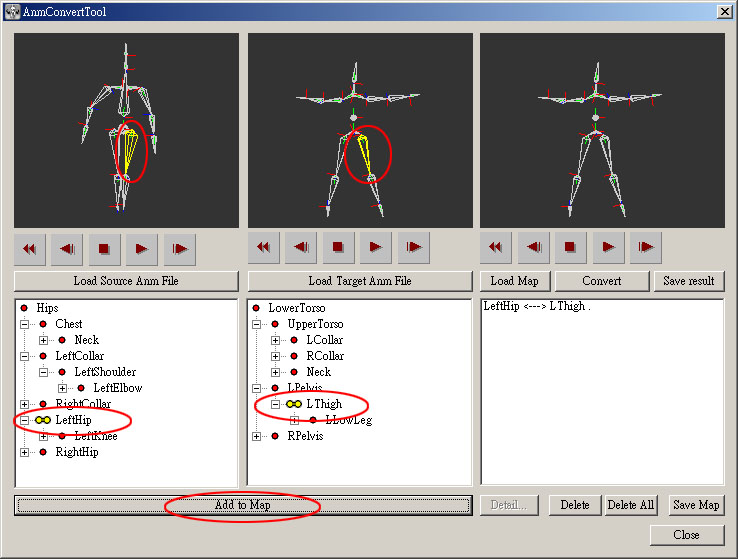
Click "OK", the backdoor interface of the BVH motion converter will be now show as below.
Click "Load Source Anm File" to load a BVH file, and Click "Load target Anm File" to load "Base.htr" in the same folder of the converter. The Skeletons will be displayed in the viewport. Go to the table under the view port, double-click the node dot to expend the tree. Notice when a node is selected (yellow), the corresponding bone will be highlighted in the viewport above. Select the corresponding bones of the BVH and HTR skeletons, for example, the bones named "LeftHip" of the BVH and "LThigh" of the HTR, then click "Add to Map" to create the mapping relation between these two bones.
Create mapping relations betweens bones until all the HTR bones
are mapped. Click "Convert", you'll see the result of conversion in the left view port.
You may find the result is not perfect, some limbs seem twisted or flipped. That's because the initial poses are different between the BVH file and "Base.htr". Click "Save Result" to save the converted HTR file. Click "Save Map" to save the mapping table as a txt file.
Close the backddoor program. The next step will show you how to set the rotation offsets and refine your results. Step 2: Prepare a custom profile. Select one of the mapping items and click "Detail" to bring up a dialogue for the rotation offset setting, but the function here is not yet completed. We suggest simply using a text editor to modify the rotate offset settings. Please follow the steps below: Copy the mapping table txt file to the BVH Motion Converter folder and rename it as a *.prf file. (You can see that there are already some prf files here. They are the original BVH profiles.) Open your prf file with a text editor (ex. Windows Notepad) The text file contains the mapping table only. Add the profile name, "Position", and "FrameRate" on top of the mapping table.
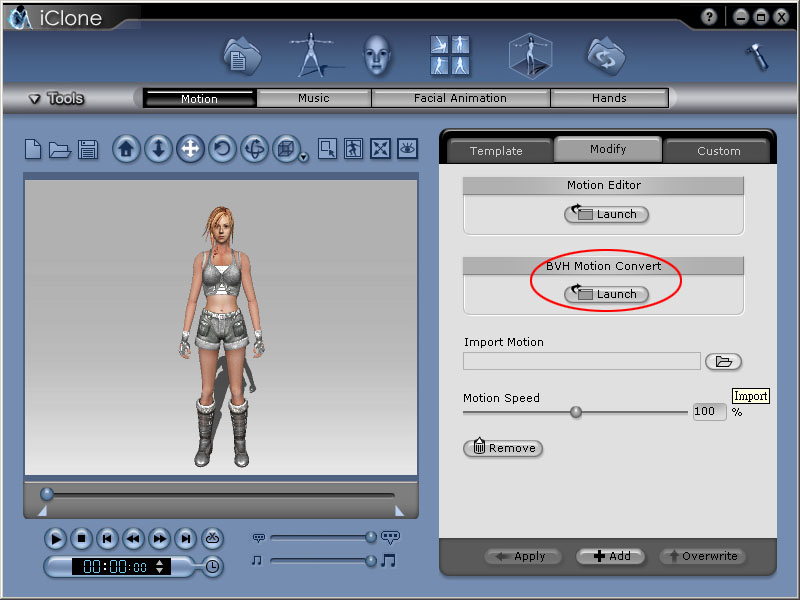
The frame rate values are usually 30 or 60, you can find this setting in the BVH file (expressed by frame time, 0.033333 seconds frame time equals to 30 frame rate). We'll determine the position offset value later. Save the .prf file in the "BVH Motion Converter" folder. Step 3: Set pose offsets. Run iClone.Go to Animation>Motion>Modify tab, launch BVH Motion Converter.
Launch the "normal" BVH Motion Converter from iClone. You can see that the new profile is added in the BVH format list. Load the BVH file, select the custom profile, click "Convert" then "Save and Apply", save the vns file.
iClone will load the motion data and apply it jautomatically. You may notice that the character is not standing on the ground and some limbs seem twisted. Let's take care of the floating problem first. Go to Avatar>Character>Modify tab, adjust the values of
the XYZ spinners in Character Position panel, Tips: you can turn the grid on (in preference) or load a prop and use it as a position reference. 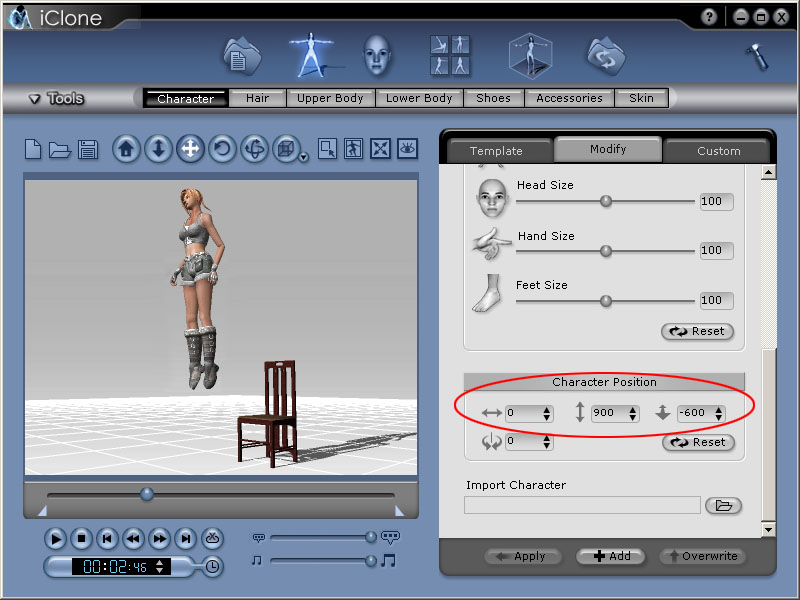
Open the custom prf file with text editor, type the offset value next to the "Position". If the (X, Y, Z) values are (a, b, c), then set the offset value
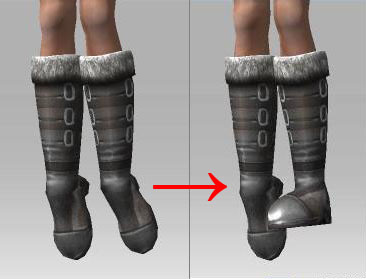
as a, b, -c. Next we'll fix the twisted limbs, take the left ankle for example. The feet point downward unnaturally, to improve it, find the corresponding bone name in the profile (in this case, the "LFoot" bone), remove the dot "." behind the bone name and type the XYZ rotate offset value "90,0,0". Save the prf file.
Now switch to the BVH Motion Converter, "Convert" the motion again and "Save and Apply". You can see in iClone the left foot is rotated to a more proper angle.
Modify the values of XYZ rotate offset of the twisted limbs one by one. It may take some time and needs you to switch among the text editor, BVH Motion Converter and iClone to modify the profile and check the result. When all the offset values are determined, save the prf file. You can use this BVH profile to convert all the BVH motion data with the same format. The technique described in this tutorial can be used to make many kinds of transitioning displays, like TV, signboards, etc. |
||