|
|

|
|||||||||||||||||||||||||||||||||
 |
| iClone™ 3D Studio Max® quick step tutorials | |||
Creating Camera Animation for iCloneLevel: Beginner to Intermediate 3DS Max skills About the tutorial: What you need for ths tutorial:
What you need to know to complete this quick tutorial:
Step 1: Prepare a reference object. Open 3D Studio Max, Create a New Scene. In 3D Studio Max, set the system unit.
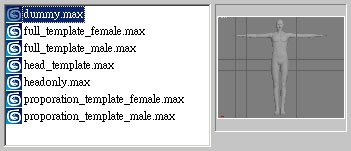
You need a scale reference object representing an iClone character in 3ds Max before you start editing camera movement. Load the iClone MAX template file for your reference Choose File>Merge... to merge the mesh object name "Dummy" in dummy.max.
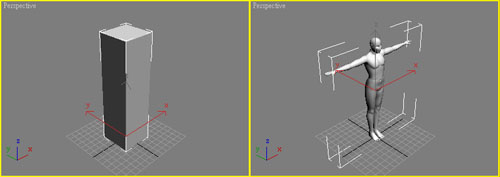
Alternatively you can just create a box which is about 50 cm long, 50 cm wide and 180 cm high at the origin (0,0,0,). Either the box or the "Dummy" can serve as a reference object as we only need something to reference our camera to while keyframing the camera animation.
Step 2: Create an animated camera. Create a camera. iClone supports both "Target" and "Free" cameras, but only one camera is allowed in a scene. Adjust the camera position and orientation to set the desired shot. Edit camera animation as you usually do in 3ds Max. If you want a direct "cut" between two shots, set the animation key of the following shot right next to the previous one.
Do the same to Position X, Y, and Z. If you use Target camera, both camera and camera target nodes needs to be set this way. If you use Free camera, both camera position XYZ & rotation XYZ keys should be properly.
Step 3: Export camera. Remove the reference object. Note: You can export the reference object with camera, it will be shown in iClone. You may keep it as a shot reference until you finalize the camera animation. Choose File>Export... to export camera for iClone.
In the File Type option, choose iCloneExp (*.VNS) file format and assign the designate folder. The camera vns file
must be put in the camera template folder, the directory path is
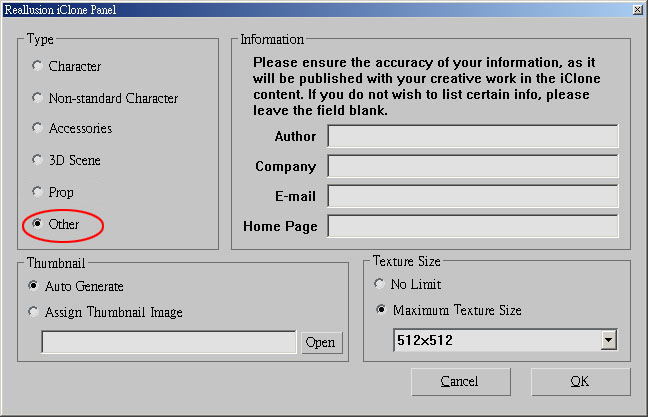
Choose "Other" object Type then click "OK"
Step 4: Apply and fine tune camera aniamtion. Run iClone. Go to Scene>Camera>Template tab, find and apply the custom camera just exported.
Check how the camera animation works in iClone. You may need to go back and forth between 3ds Max and iClone, and edit the camera animation to get the final desired shots. |
|||